Tuesday 30 April 2013

Burning your video to DVD

Open iDVD
Create new project. Name and choose location to save project.
Select relevant aspect ratio (standard or widescreen)

Before doing anything else, we need to make sure the settings are correct. In the menu bar > iDVD > Preferences > General > Uncheck show Apple watermark.
Projects > Video Mode: PAL


When it opens it will look like this:
 
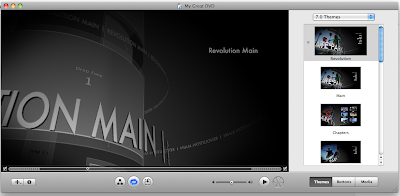
         ^ Info button    ^ Show Drop Zones       ^Play

Playing in the centre is what the DVD menu looks like. Running along the right hand side is the menu themes you can choose from. Select a theme if you want a menu. You will notice grey 'drop zones', these are areas where you can drag and drop still images or video to play like previews before the the DVD plays. Be sure to drag and drop the image/video directly into the drop zone, other wise you will be adding a video or image to be played. Depending on which theme you have chosen there may be more than one drop zone. Click on the show drop zones button to identify all of them.

Click on the Info button (bottom left of the screen). It will give you the menu info where you can choose the music or the loop duration of the background for example.

It is not necessary to have a menu, as you can set the DVD to play as soon as it is inserted into the drive or player.

Click on DVD map (first button of the three in the middle)
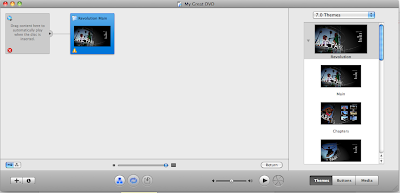
                                ^ DVD map  
                                          
This shows you the flow of the DVD. As you can see you can drag contents into the first box to play automatically when inserted. I would use this option if I were showing a video piece at an exhibition on a loop. 
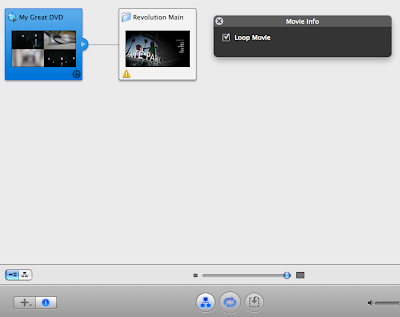
 
             ^ Info button
 Here I have dragged my video directly into the first box, then clicked on the Info button bottom left. The grey movie info dialogue box opened, I clicked on Loop Movie. This means that my movie will automatically play looped when inserted into the player. 


If you do not want that to be the case, you can click on the Add (+) button next to the info button. Add movie. This will add a box after the menu into which you can drag and drop your video.

You can add multiple videos or slideshows. It will look like this in the DVD map view:


Or like this if you unclick DVD map:

If you click on the video titles (seen here under Revolution Main), then the info tab you can change the font, colour etc. 

If you click on any of that text (ie Revolution main, sequence 2, test) you can rename them too. 


You can preview your DVD at any time by clicking on the play arrow.
Once you are happy with your DVD, click on the burn button directly next to the play button.
It will direct you to insert a blank DVD. Then it will proceed to burn the DVD. You can make multiple copies easily by inserting another blank DVD when it has finished the first.

Exporting your finished video

File > Export > Quicktime Movie

Name and  choose location.
Settings: Current Settings
Include: Audio and Video (unless of course your video in silent, then you can just include video)
Markers: None
Make movie self contained is checked.


You may also like to export a version specifically for the web (eg.  your blog or vimeo), so it will need to be compressed into a smaller file.
File > Export > Using Quicktime Conversion
Name and choose location
Format: Click on Options.
Video Settings > Compression type > H.264
Frame rate: Current
Compressor Quality > Best
OK

Uncheck prepare for internet streaming.
OK

Saturday 27 April 2013

Transitions in FCP


From the FCP manual:

Common Types of Transitions 
A cut, the most basic type of transition, is a transition with no duration; when one shot ends, another one immediately begins, without any overlap. All other transitions gradually replace one shot with another; when one shot ends, another one gradually replaces it. There are three very common transitions used that occur over time: fades, cross dissolves, and wipes. 

A fade-out begins with a shot at full intensity and reduces until it is gone. A fade-in begins with a shot at no intensity and increases until it is full. These are the common “fade to black” and “fade up (from black)” transitions. 

A cross dissolve involves two shots. The first shot fades out while the second shot simultaneously fades in. During the cross dissolve, the two shots are superimposed as they fade. 

A wipe is where the screen splits, moving from one side of the image to the other to gradually reveal the next shot. It is more obvious than a fade or cross dissolve. Final Cut Pro also comes with two audio transitions: a +3 dB cross fade (the default) and a 0 dB cross fade 

Cross Fade (+3 dB):  Performs the same operation as Cross Fade (0 dB), but applies an equal-power ramp to the volume level, rather than a linear ramp.

Cross Fade (0 dB):  Fades the first clip out, while simultaneously fading the second clip in. This effect applies a linear ramp to the volume level. As a result, the volume level dips in the middle of the cross fade. 

Each cross fade results in a different audio level change as the transition plays. Your choice of cross fades depends on the clips you’re transitioning between. Try one, then try the other to see which sounds better.

Using Transitions in Your Sequences 
Transitions, especially dissolves, generally give the viewer an impression of a change in time or location. When very long transitions are used, they become more of a special effect, useful in creating a different atmosphere in your sequence. You can use transitions to: 
  • Convey the passing of time between scenes 
  • Fade up at the beginning of the movie or scene 
  • Create a montage of images 
  • Fade out at the end of the movie or scene 
  • Create motion graphic effects 
  • Soften jump cuts (cuts between two different parts of the same footage) 

To add the default video transition, do one of the following: 
  • Select an edit point between two video clips or position the Canvas or Timeline playhead at the desired edit point, then press Command-T.
  • Control-click an edit point between two video clips in the Timeline, then choose Add Transition from the shortcut menu. The name of the current default transition appears next to the command in the shortcut menu.

To add a transition from the Effects menu: 
1 Do one of the following: 
  • Click an edit point between two clips in your sequence to select it. 
  • Position the Canvas or Timeline playhead at the desired edit point. 
  • Position the Canvas or Timeline playhead on a transition that’s already been edited into your sequence. 

2 Do one of the following: 
  • Choose Effects > Video Transitions, choose the type of transition, then choose the desired transition from the submenu. 
  • Choose Effects > Audio Transitions, then choose the desired transition from the submenu.
If there are enough overlapping frames on both sides of the edit point, the selected transition is added to your edit, centered at the edit point.


How Transitions Appear in the Timeline 
Transitions are applied between two adjacent clips in the same track of a sequence in the Timeline. In the Timeline, a transition is displayed as an object overlapping two adjacent clips. You can still see the cut point between the two clips. A dark gray slope in the transition’s icon in your sequence indicates the speed, alignment, and direction of your transition. 


Aligning a Transition in the Timeline 
You can place a transition so that it starts on, centers on, or ends on the edit point between two clips in the Timeline. You should choose a transition alignment based on the editorial effect you want to achieve: 
  • Starting on the cut:  Choose this alignment if you want the last frame of the outgoing clip to be fully visible before the transition begins. 

  • Centered on the cut:  Choose this alignment if you want the cut point between the two clips to be the midpoint in the transition. 

  • Ending on the cut:  Use this alignment if you want the first frame of the incoming clip 
    to be fully visible. 


Effect filters in FCP


Applying a Filter to a Clip 
You can apply filters to clips in a sequence or to clips in the Browser, but it’s very 
important to understand the distinction between these two methods. 
 If you apply filters to a sequence clip:  The filters are applied only to that clip. The 
master clip in the Browser remains untouched. 
 If you apply filters to a master clip in the Browser:  Instances of that clip already in other 
sequences are untouched, but if you edit the master clip into a sequence, the new 
filter accompanies the clip into the sequence. 
In most cases, you apply filters to individual clips in sequences, not to master clips in the 
Browser. There may be occasions where you want every instance of a master clip edited 
into a sequence to have the same filter applied, such as during color correction. In this 
case, apply the color correction filter to the master clip in the Browser. However, filters 
applied to clips are still independent of each other. If you modify the filter parameters 
for a master clip, the same filter parameters in affiliate clips are not modified. 
Tip:  To maintain consistent filter settings across multiple clips, you can copy and paste 
filter settings using the Paste Attributes command.

To apply a filter to a clip in a sequence, do one of the following: 
  • Select one or more clips in the Timeline, then drag a filter from the Effects tab of the Browser to one of the selected clips in the Timeline.

  • Select one or more clips in the Timeline, choose Effects > Video Filters, then choose a filter from the submenus. 
Open a sequence clip in the Viewer, then do one of the following: 
  • Choose Effects > Video Filters, then choose a filter from the submenus. Drag a filter from the Effects tab of the Browser directly into the Viewer. You can apply a filter to an entire clip or just part of a clip. 


Once you add a filter or transition you may get a red bar running along the top of your timeline, and if you try to play from your time line it may say UNRENDERED on a blue and black screen. This simply means you need to render the clip to be able to view it. This may take a while depending on the degree of the effects and the length of the clips. 

In the menu bar Sequence > Render > Both
Short cut is Command R.


2nd Gen and Contemporary Video Artists

IMPORTANT AND INFLUENTIAL 2nd GENERATION VIDEO ARTISTS AND CONTEMPORARY VIDEO ARTISTS:
Marina Abramovic : Starting out as a painter, Abramović subsequently shifted her focus to conceptual work, sound installations and mainly performances. She started in 1973 performing several works such as"Rhythm", in which she intended to stretch the limits of her body and mind. This theme appears in all her work, especially in her collaborative work with Ulay.

Dara Birnbaum : appropriates the television images and works with them in a subversive way, but her explicit intention is to show its superficiality and to unmask its manipulative methods.

John Cage : The American composer John Cage, to whom every kind of sound was considered to be music music, is probably best known for breaking the boundaries between music, performance, noise and sound.

Sophie Calle : Consciously conceals the borders between art and life, fiction and reality, and between the private and public. Transforms her daily life with a series of performances, usually executed as a combination of texts and photographs.

Gary Hill : began working with video, text and sound in 1973 and has produced a major body of single-channel videotapes and video installations that includes some of the most significant works in the field of video art. 

Pierre Huyghe : Much of Huyghe's work examines the structural properties of film and its problematic relationship to reality. His work frequently mixes fact with fiction.

Paul McCarthy : performance work in the 70s; in late 80s video/performance installations.

Pipilotti Rist : aesthetic language quite close to music videos through the combination of music, performance and electronic manipulation. 

Matthew Barney : He is best known as the producer and creator of the CREMASTER films, a series of five visually extravagant works created out of sequence (CREMASTER 4 began the cycle, followed by CREMASTER 1, etc.). The films generally feature Barney in myriad roles, including characters as diverse as a satyr, a magician, a ram, Harry Houdini, and even the infamous murderer Gary Gilmore. 

Shirin Neshat : one of a growing number of contemporary international artists whose work crosses boundaries of nationality, culture, and artistic medium. Using photography and video, she has produced a body of work that investigates the cultural conflicts resulting from the collision of tradition and modernity in the East and West. Neshat turned to the media of photography and video in an attempt to investigate the role of women and feminism in Islamic society as well as her own status as a self-imposed artist in exile.

Soda_Jerk :  remix artists who work across the media of video, photo-collage and installation. By atomising and reassembling recorded culture they aim to manufacture counter-mythologies of the past that open new possibilities for thinking the present. 

Bill Viola : "My work? - says Bill Viola - is focused on a process of self-discovery and self-realization. Video is part of my body. It is intuitive and subconscious.

More links:

Pipilotti Rist- I'm Not The Girl Who Misses Much
Pipilotti Rist- I Couldn't Agree with you MorePipilotti Rist - Be Nice To Me (Flatten 04)

Pipilotti Rist- Sip My Ocean (1996)

Bill Viola - The Reflecting Pool
Bill Viola - Ocean Without a Shore - Venice Biennale 2007

Gary Hill - Mouth Piece (1978)
Gary Hill - Site Recite (a prologue) 1989 

Switch (eye), by Tony OURSLER (1996)
Tony Oursler - Axe
David Bowie - Where Are We Now? (video by Tony Oursler)

Contemporary video art, whilst still including single channel or multi channel works (video works played on the one or multiple screens), has extended into another newish art form; installation. This is where the videos are shown, either projected or on a monitor, amongst an environment incorporating sculptural elements, objects, or intervened space. The video may be projected onto everyday objects, such as in Pipilotti Rist's Himalaya Sisters Living Room, or onto effigies, such as Tony Oursler's many contemporary works.

Matthew Barney's Cremaster Cycle is a pivotal contemporary work, in that it has the aura of a big budget Hollywood feature film/s, yet at it's centre it is conceptual and experimental.

Tuesday 23 April 2013

Video Art Homework

Search the VideoArtWorld website using the categories check boxes for video work which is related to your topic or project. Link it on your blog. Write a short 50-100 words on how this video made you feel.

(don't stop at one... if you find more, keep watching and researching!)

Motion controls in FCP

You can easily control the "motions" of your clips in the timeline to create some very effective looks.

Double click on the clip in the timeline. Click on the 'motion' tab in the Viewer window. Here you will be able to adjust the scale, rotation and position of the image, as well as crop it and feather the edge, adjust the aspect ration and the opacity, amongst other things, just by changing the parameters.


For example you could have multiple create a grid of 4 videos just by scaling them to 50 and repositioning the centre of each.


You can easily change the speed or direction of a clip. With the clip selected (either in the timeline or in the browser) > Modify > Change Speed (command J). If you want the clip to play in slow motion change the rate to a number less than 100, if you want it to play quicker change it to a number greater than 100. You can also check the reverse box if you want it to play backwards. The number in the rate box will turn red if reverse is selected.


Final Cut Pro - Getting started and online resources

Final Cut Pro can be daunting when you first use it. We will do our best to guide you through, but a very very good resource which you should also use is the Final Cut Pro manual which is available online. I have been using this program for years and I still refer to the manual as my bible!!


Video Format Basics - In Australia we use the PAL standard, at 25 frames per second. The aspect ratio of a video frame is width with respect to height, so Standard Definition video has an aspect ration of 4:3, while High Definition is 16:9.

INITIAL SET UP
When you open Final Cut Pro you will need to choose you initial settings (Final Cut Pro will prompt you to set this up upon opening if it is the first time you are using the program.)
You can read the full manual entry here, but below is a guide to easy setup:

Open Final Cut Pro. Menu bar > Final Cut Pro > Easy Set Up.
Now, the settings you chose will depend on the type of video you took, or the settings on your camera. Did you take a High Definition video? How many frames per second did you shoot your video in?
Change the format and the rate according to the camera's settings.
If you shot in High Definition, chose HD. Choose the frame rate matching that of your camera settings. Use HDV - 1080p 25.
Otherwise, choose PAL, rate should be 25 and use DV-PAL.


It is sometimes difficult to understand which settings to use. If you have chosen a setting that doesn't match the footage you end up importing, FCP will change it once you have started to work with the footage in the sequence.

The next thing you need to do is set your scratch disk. This is the where FCP will save your work, and it should be where you keep you clips. Ideally this will be your external hard drive. A USB stick does not work the same way as an exHD in this case.
Menu bar > Final Cut Pro > System Settings.
Click SET and locate your Hard Drive, you can even create a new folder to save all of your FCP documents in.
Click CLEAR on Mac HD (the computer's hard drive), so that it only saves to your hard drive.
Click OK.


EXPLORING THE FCP WORKSPACE


Each of the windows can be opened or closed individually. If you accidentally close the browser for example, you can reopen it by menu bar > window > browser. If you want to hide all of the windows: menu bar > final cut pro > hide final cut pro (the short cut is command H).


IMPORTING CLIPS
Make sure you have your video clips, still images and sound/music saved onto your hard drive.
File > Import > Files.
Locate your clips. You can select more than one by holding down the shift key.
Your files (clips, images or sounds) will appear in the bin in the browser window.


 If you double click on a clip/image/sound it will open in the Viewer window, where you can watch/listen. 

EDITING CLIPS
You can mark in where you want your clip to begin and out where you want it to end, then click and drag the clip from the viewer down to the timeline.

You can also drag and drop clips straight from your bin into the timeline.

The beauty of FCP is that it is a non-linear editing program, which means you can work on multiple scenes/sequences at once, then arrange them in order later. To open another sequence File > New > Sequence.

TIMELINE

You can have layers of clips, like in photoshop, just drag and drop the second clip above the first (not directly on top, but just above to create a v2 (video 2) in the timeline. The top clip will be the only one visible until you change the composite mode or resize or cut the clip (which we will cover soon).


You can drag the clips to any position within the timeline. If you have linked selection on the audio will move with the video (and vice versa), if it is off, you can separate the video from the audio (including deleting it from the timeline).


Having snapping on means when you move clips around it will snap to the edit, marker or playhead it is closest to.


TOOLS
The 2 most common tools you will use are the selection tool and the razor blade tool.
The selection tool has the same function as in all of the other programs we have been using thus far.
The razor blade tool is used to cut your clips for editing. It allows you to cut unwanted footage from your timeline. 
You can cut a clip anywhere in your timeline. Make 2 cuts and delete in between (select section to be deleted with the selection tool and hit delete on the keyboard). You can then simply drag the clip to meet up with the previous edit.


Figure. Timeline window showing the Razor Blade tool positioned over a clip.
Figure. Timeline window showing a video clip cut in two.
 

Razor Blade All: Cuts all clip items on all tracks at the point where you click in the Timeline.
Figure. Timeline window showing the Razor Blade All tool positioned over a clip.
Figure. Timeline window showing a clip's video and audio tracks cut in two.


If you delete too much of a clip, you can simply click on the edge of the clip and drag it to where you want the clip to end. The beauty of non-destructive editing!! As you move your arrow over a clip it changes from an arrow (around the center of the clip) to a Resize pointer (at either the beginning or the end of the clip).

Figure. Timeline window showing the Resize pointer positioned at the end of a clip.
Figure. Timeline window showing a clip being extended by dragging.

Another interesting and easy effect.

In the bottom left hand corner of the window you will see this little tool.


If you click on it a white line will appear in your timeline.


Then select the pen tool.


You can then add keyframes to the white line with the pen tool.


If you drag a keyframe down to the bottom of the timeline, it reduces the opacity of the video.


This is really useful to fade in and out, and also to lay one video over another.


Sunday 21 April 2013

Final Cut - Stop Motion Video

Taking your photos
You have a couple of options here, depending on your subject matter.

i. Most digital cameras have a "shutter burst" or multi-shot function, where by holding down the shutter button it takes a burst of photos in rapid succession. This is a good option if you are using an animated object (for example a person or a moving object like a car).

ii. Your other option is to set your camera up on a tripod in front of your inanimate object. Take a photo, move your object slightly, take another photo, move your object slightly... repeat.

Remember, that a moving image is generally 25 frames per second. That's 100 pictures for 4 seconds. Or 1500 for 1 minute! For stop motion, we don't have to adhere to this too closely, as it is the stop part which gives it its character. So you might like to opt for half that, so 12 frames per second, for example, is perfect for Stop Motion.

Editing your images
You can edit your photos in photoshop if you want to, but remember you will need to be consistent, it may look odd if you only edit a couple and not the rest. Save as jpgs.

Putting it altogether
Open Final Cut Pro. First things first, click on Final Cut Pro in the menu bar > User preferences > Editing tab > Still/freeze duration. Change the time for how long you want your individual photos to play for. It is in the format of hh:mm:ss:ff so you will change the frames. If you are working to 12 frames per second for example, it would be 00:00:00:02 (as there are 24 or 25 frames per second).


Import all of your photos. File > import > Files. You can select more than one by holding down the shift key. It is a good idea to have them in order already, so that when you start putting them together in your timeline you won't have to search, and you can just simply select them all and drag and drop into your timeline.

You can add effects, the easiest way to do this is to export your animation as a Quicktime, then import it back into Final Cut, then add the effect to the whole clip. Export again as a Quicktime when complete.

You may also like to have music, if it is an mp3 or wav you can simply drag and drop the music file into your timeline.